Dive

I enjoyed making the previous card and loved the outcome so much, that I wanted to repeat the recipy: choose which one of the four colours will be the accent color, and choosing 1 or 2 as main background colours. The other colour is used for colouring. The colours I used were the ones from the Chocolate Baroque challenge 34.

Continue reading

Home sweet home

Playing with bister, it gives nice backgrounds but then what to do with it? Well, why not stamp over it and use the bister as colouring of the image.. And so I did. I stamped a fairy castle over it, the red representing the magic that flows from the building, or the pixie dust. It’s actually an underwater castle (Chocolate Baroque), so it could also be a mermaid hideout. Tiny mermaids then, as the castle is small.

Daqadoodles141108za143951

After that I added more colour around the image, the green is added distress ink (ink on an acryllic block + waterbrush).

Daqadoodles141108za144012

I then created the frame, it was on bright green cardstock. I stamped over the frame with several tree stamps / leaf stamps from Chocolate Baroque. I say frame because it is a frame but placed behind the center image. I cut out the inner part of the backing paper to save weight – 20g is reached quite fast.

I placed a stencil, a Crafter’s workshop one that has to do with underwater (forgot the name), and applied blue distress ink through the stencil. Next, I applied molding paste (moulding paste? I know one is unhealthy fungus and the other means shaping, but which one is which.. hmmm…). The paste absorbed some of the colour of the ink beneath it and got a nice blue colour. I cleaned the stencil and replaced it and added a bit of perfect pearls blue powder on it. (Gah me and names).

Daqadoodles141108za144026Last I glued the main image on the frame and added the glossy accents in a non straight and non-clean line all around the image/frame. It’s quite hard to try to make the line wiggle and look like applied with a shaking hand when you intend to do so.

Daqadoodles05

It does have an underwater feel to it, doesn’t it? So my initial idea of a fairy home – well, it’s a waterfairy home now!

This is my entry for Melissa’s Vandicrafts Artistrsy Challenge #17 – Home Sweet Home.


Journey through an exotic reef

A short post this time, as I’m tired. No interesting text this time, so just sit and relax and watch the aquarium. Uh photo’s.


Daqadoodles141021di215305

(Was also made for the Vandicrafts Artistry challenge: birthday, but I am too late for that one. Hmm maybe I am on time for anything goes?)(Oh too late for that one too, but the current theme fits as well: make your own background.)

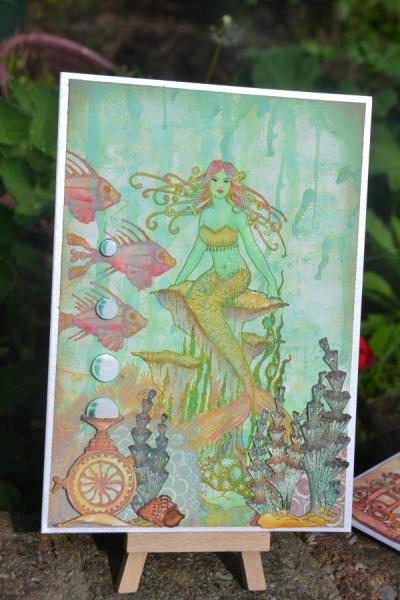
The reef is printed. The origin is a background I made earlier. (See the post about marbled pearls). I scanned it and edited it digitally, then printed. This will be available in my shop too.The fish is from Designs by Ryn, the seaweed is a crafter’s workshop stencil, and the text is Stampendous. (could be wrong there).

After printin the background I stamped the fish with Stazon Pumpkin or Crimson red. Then I took my distress inks (ripe persimmon, wild honey, dried marigold, rusty hinge, and maybe a few more), dabbed them onty an acryllic block and took a waterbrush to colour the fish. I also went over the edge of the reef and a bit in between the stones with that brush – the ink of the printer is watersoluble so the colours brighten a bit.

Daqadoodles141021di215959

I then masked off the fish and coloured the water around her, using a distress marker and a waterbrush. Then I placed the stencil and coloured it with various green/red colour distress inks. Only after that did I remove the mask from the fish.

To finish it off I added paper/gloss/perlen pearls to the overhanging of the reef. (Now that I look at it, next time I should make bubbles from them!). I did some marbling in them. The eye of the fish is made with the gloss/paper pen first, then let it dry and cover the pupil with glossy accents.

Daqadoodles141017vr153457

Last, I stamped the sentiment. To make it stand out more I outlined the text with a white pen.

Ink the edges a bit and glue onto a card – this could be quite a fast card! Looks lovely, doesn’t weigh too much (to keep the postage costs in check) and looks cheerfull.

I’d like to enter this card into the following challenges: